For those who create WordPress sites it is now standard practice to use the permalink function to be able to direct pages with the article title, this function guarantees excellent results in terms of SEO. However, it may happen that by modifying the permalink the site is no longer navigable, showing only the home page and a very annoying "404 Page Not Found" error when clicking on any link.
In our case we ran into this problem when switching from PHP version 7 to 8 on our webapp on Azure.
To solve a problem you always need to identify the cause, in this case the permalink function uses the modification of the file .htaccess a file that contains configuration directives that allow the web server to understand how to direct received http requests. So the problem arises when our hosting uses a webserver other than Apache and does not recognize the directives present in the .htaccess file. In our case the webserver is Nginx.
In fact, on Azure by switching to PHP 8 the docker image uses the Nginx web server therefore the problem discussed in our article arises.
try_files $uri $uri/ section /index.php?$args;
For those who use the Microsoft Azure Webapp service, as in our case, there is a second problem because with ssh access you do not have the possibility to modify the nginx configuration file. In fact, every time the web app is restarted, the configuration files are replaced by those provided in the docker image, therefore to make changes you need to find a workaround.
So here are the steps to take
1. Copy the Nginx configuration file to your Azure home folder;
2. Edit the configuration file with instructions for dealing with permalinks;
3. Configure the Azure web app so that when it starts it overwrites the nginx configuration file with the copy in our home.
Let's see each of the following steps below.
First we need to make sure we can modify the web server configuration file in our azure webapp. We log in via ssh using the appropriate azure tool:
https://[APPNAME].scm.azurewebsites.net/webssh/host (replace [APPNAME] with the name of your application)
Once inside we must copy the configuration file of the Nginx instance into our home folder with the following command
cp /etc/nginx/sites-enabled/default /home/defaultAt this point we are halfway through the work we must edit the configuration file just created with the command:
vi /home/default
We then modify the location section / by adding the instruction
try_files $uri $uri/ /index.php?$args;
after our intervention the section should look like this:
location / {
try_files $uri $uri/ /index.php?$args;
index index.php index.html index.htm hostingstart.html;
}
Save with ESC: :
cp /home/default /etc/nginx/sites-enabled/default; service nginx restart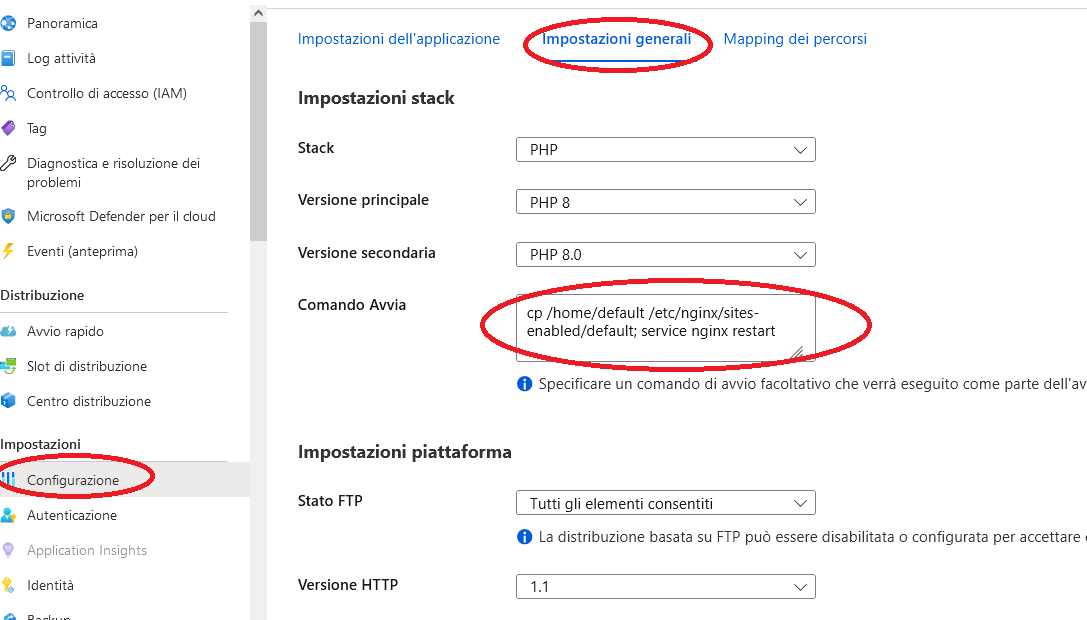
Restart the webapp and you're done!!!